
 Daniel Marquez (C:)
 Experiences
TransparenSea
Abstract
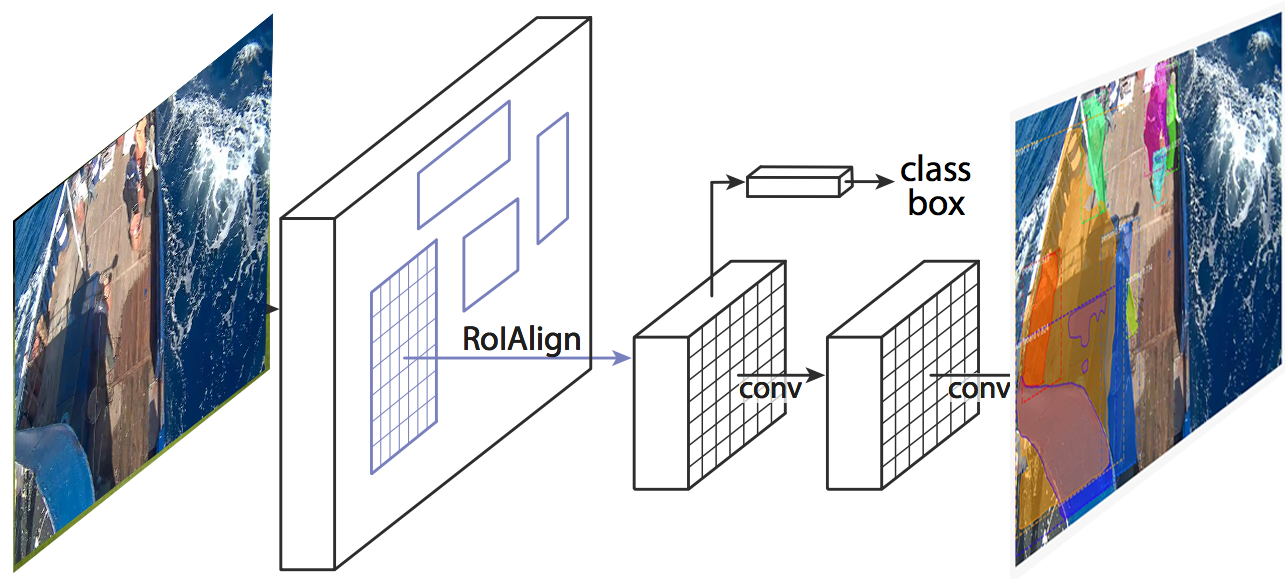
Commercial fishing remains one of the most dangerous jobs in the nation, with a fatality rate that is 23 times higher than for all other workers1. In order to increase awareness of safe fishing practices on vessels at sea, unsafe fishing practices that are generated out of habit must first be identified. TransparenSea is an AI system that uses existing video streams of electronic monitoring data from a tuna longline vessel to identify fishing practices on the operation deck at sea to compute how “safe or unsafe” certain fishermen are poised while on duty. Using instance segmentation through a convolutional neural network for multi-object detection and classification (MASK R-CNN) 2, we can better understand how far fishermen tend to place their upper bodies or appendices over the threshold of the vessel while gathering the harvest from the longline, putting themselves at greater risk of falling overboard. Ultimately, TransparenSea aims to identify where existing fishing practices can be improved, ensuring that every fisherman that goes out to sea can safely return home.
Technical Lead
As the technical lead for the project, I started contributing to the project by creating an annotation script that allowed us to take the existing bounding boxes in the dataset and label them. I then created another script that took the annotated data we individually did and split it into training sets, validation sets and evaluation sets. I initially looked at YOLO v39, did some testing and noticed that I needed to “letterbox” the images in order to get improved results. This meant to take an image, keep it’s ratio intact, fitting it into a square and filling in the rest of the square with grey. Even though the results improved, It still wasn’t good enough. After a teammate brought to the group’s attention that the MASK R-CNN architecture might be a better solution, I put my attention towards implementing it.
Setup
- Launch a new ec2 instance on aws using
Deep Learning Base AMI (Amazon Linux) Version 25.0with a p2.8xlarge instance type. - ssh into the instance using this guide
-
Following this guide, change the CUDA runtime version from 10.2 to 10.0 by executing these two commands.
$ sudo rm /usr/local/cuda $ sudo ln -s /usr/local/cuda-10.0 /usr/local/cuda -
Verify the change by executing these commands:
$ cd /usr/local/cuda/samples/1_Utilities/deviceQuery $ sudo make $ ./deviceQuery ./deviceQuery Starting... CUDA Device Query (Runtime API) version (CUDART static linking) Detected 1 CUDA Capable device(s) . . . deviceQuery, CUDA Driver = CUDART, CUDA Driver Version = 10.2, CUDA Runtime Version = 10.0, NumDevs = 1 Result = PASS -
Install pyenv using its installation guide with the caveat that ‘exec “$SHELL”’ didn’t work for me to begin using pyenv. I had to reboot the instance and ssh back in.
$ git clone https://github.com/pyenv/pyenv.git ~/.pyenv $ echo 'export PYENV_ROOT="$HOME/.pyenv"' >> ~/.bash_profile $ echo 'export PATH="$PYENV_ROOT/bin:$PATH"' >> ~/.bash_profile $ echo -e 'if command -v pyenv 1>/dev/null 2>&1; then\n eval "$(pyenv init -)"\nfi' >> ~/.bash_profile $ sudo reboot -
To prevent an ‘ImportError: No module named ‘_ctypes’ ‘ error while installing tensorflow, you must install libffi-dev.
$ sudo yum install libffi-devel -
Install the latest stable release of python 3, during the time of this writing, it was 3.7.8.
$ pyenv install 3.7.8 -
Install virtualenv as a plugin for pyenv using this guide with the same caveat as in step 5, where instead of ‘exec $SHELL’, do a ‘sudo reboot’.
$ git clone https://github.com/pyenv/pyenv-virtualenv.git $(pyenv root)/plugins/pyenv-virtualenv $ echo 'eval "$(pyenv virtualenv-init -)"' >> ~/.bash_profile $ sudo reboot -
Create a new virtual environment.
$ pyenv virtualenv 3.7.8 py3 -
Launch new environment.
$ pyenv activate py3 -
I loosely followed the Mask RCNN installation guide by not executing ‘pip install -r requirements.txt’ but instead manually installing each dependency. While the text file indicates any tensorflow model greater than 1.3 works, tensorlfow versions 2+ don’t work. I used the latest tensorflow 1 version that contained tensorflow-gpu.
$ git clone https://github.com/matterport/Mask_RCNN.git $ pip install numpy $ pip install scipy $ pip install Pillow $ pip install cython $ pip install matplotlib $ pip install scikit-image $ pip install tensorflow==1.15.0 $ pip install tensorflow-gpu==1.15.0 $ pip install keras==2.0.8 $ pip install opencv-python $ pip install h5py $ pip install imgaug $ pip install IPython[all] $ cd Mask_RCNN/ $ python setup.py install $ cd .. -
Clone the TransparenSea Mask RCNN repo.
$ git clone https://github.com/Bumangues/Mask_RCNN.git transparensea -
Get the latest coco weights.
$ wget https://github.com/matterport/Mask_RCNN/releases/download/v2.0/mask_rcnn_coco.h5 -
Move the weights into the project.
$ mv mask_rcnn_coco.h5 transparensea/project/
I first experimented with a 90-10 split of training and validation data but after being informed of discussions with Adam, it was recommended that we did a 66-33 split, which was 1000 images for training and 500 images for validation. To not start the training from scratch, I transferred the weights from COCO, with a 0.001 learning rate, batch sizes of 1000 and 5 epochs. After finishing training, I implemented a mean average precision (mAP) evaluation for the evaluation data. The average precision provides a measure of quality across all recall levels for single class classification and is the mean of APs in multi-class classification.